DataOps Runner Installation
Need a bit of help?
If you have any issues, we'd be delighted to help. Please contact us at support@dataops.live
Overview#
The dataops-runner is a long running Docker container that runs within a customers infrastructure (on premise or private cloud) run inside the onprem/private network to give the jobs in a DataOps pipeline access to otherwise inaccessible resources. dataops-runner regularly polls
There is a well documented process to get a DataOps runner installed, configured and connected up to your Group/Project in the DataOps.live application.
You can have many different dataops-runner in many different locations and have different jobs execute on different runners. For example if you have a tools that needs to be orchestrated in Singapore and London but there is no direct connectivity allowed between these, you can have a dataops-runner in each location (e.g. called dataops-runner-singapore and dataops-runner-london) and tag the jobs for London and the jobs for Singapore respectively.
DataOps Account#
To get started you'll need a DataOps account of course! If you don't have one, you can get set it up by logging in to your Snowflake tenant and clicking on "Partner Connect" then select "DataOps" or contact us at support@dataops.live.
Physical Infrastructure#
The dataops-runner needs to be installed on a Linux Server or Host or VM in a location that has access to Snowflake, and all the other systems/tools you need to connect to from DataOps jobs.
The exact nature of the server/VM is up to you and will differ between bare metal/AWS/Azure/
Minimum production specifications:
- Ubuntu 20.04 (18.04 is possible but not recommended)
- 4 CPU cores
- 16GB RAM
- Minimum 50GB Disk/Storage (300GB recommended)
- As a guide, for most use cases an AWS
t3a.xlarge(or equivalent) - A
sudouser
Minimum PoC/Pilot specifications:
- Ubuntu 20.04 (18.04 is possible but not recommended)
- 2 CPU cores
- 8GB RAM
- Minimum 50GB Disk/Storage (300GB recommended)
- As a guide, for most use cases an AWS
t3a.large(or equivalent) - A
sudouser
Network access#
This Server/Host requires outbound internet access, as a minimum to :
- https://app.dataops.live
- Docker Hub
- The applicable Snowflake instances
For more information see DataOps Architecture.
Docker#
Docker must be installed following the instructions here.
caution
We recommend not installing Docker via apt - as this is often quite old.
Then (if you didn't do as part of the Docker installation instructions):
- Run
sudo usermod -aG docker $USER(this allows you to run docker without being root) - Log out and log in
info
To test your docker install run:
docker run hello-worldDataOps Runner installation#
You are now ready to install the runner itself.
Step 1 - Registration Tokens from DataOps#
The Registration Token is generated automatically in DataOps.live and is used to link together the Runner you are about to create with your specific DataOps Project or Group.
These Registration Tokens are scoped. If you use the Registration Token
- Connect to DataOps Platform UI
- Open the Group or Project you want to create the Runner for (usually it's the Group level)
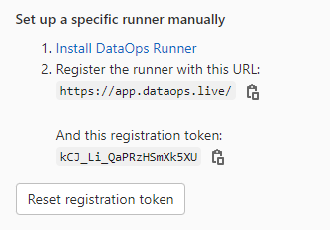
- Settings -> CI/CD -> Runners -> Expand -> Set up a group/specific Runner manually
- Ignore the section
1. Install the GitLab runner, as we'll be installing a bespoke DataOps runner instead - Copy registration token e.g.
Step 2 - Connect to Docker Hub#
On the CLI of your runner host run:
docker login --username dataopsreadserviceuser --password qf2h9372fg3ioug384caution
If this doesn't work, try prefixing with sudo but this means that the usermod -aG docker hasn't been done correctly and this may cause future issues.
Note - this is just a read only service account to allow you to pull the dataopslive/dataops-runner image.
Step 3 - Configure Runner#
This can be done in a single command:
export DATAOPS_URL=https://app.dataops.liveexport REGISTRATION_TOKEN=xxxxxxx # This is the token you copied from the UI in step 1export AGENT_NAME=my-runner-name-herethen:
docker run --rm -e DEBUG=true -v /srv/dataops-runner-$AGENT_NAME/config:/etc/gitlab-runner dataopslive/dataops-runner register \ --non-interactive \ --executor "docker" \ --docker-image dataopslive/dataops-utils-runner \ --url "$DATAOPS_URL" \ --registration-token "$REGISTRATION_TOKEN" \ --description "$AGENT_NAME" \ --tag-list "$AGENT_NAME" \ --run-untagged="false" \ --locked="false" \ --access-level="not_protected"You should now go back to the UI and, in the same location, see the new one you created e.g.
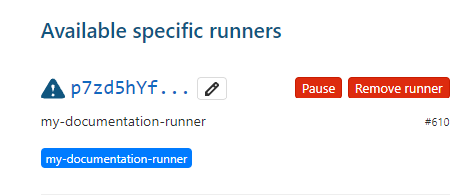
It will have been given a random identifier - this can't be changed. The blue triangle shows that this runner has registered but is not yet running.
Step 4 - Additional configuration#
There are several key configurations required that are not set using the standard register command. Set these by running the following commands on your server:
# allow agent to run up to 8 concurrent jobssudo sed -i 's/concurrent = .*/concurrent = 8/' /srv/dataops-runner-$AGENT_NAME/config/config.toml# have agent poll server every 1 secondsudo sed -i 's/check_interval = .*/check_interval = 1/' /srv/dataops-runner-$AGENT_NAME/config/config.toml# mounts the /app into /local_config inside every runner that is started by this agent.sudo sed -i 's/ volumes =.*$/ volumes = ["\/app:\/local_config:rw","\/agent_cache:\/agent_cache:rw", "\/secrets:\/secrets:ro"]/' /srv/dataops-runner-$AGENT_NAME/config/config.tomlStep 5 - Start the actual runner#
docker run -d --name $AGENT_NAME --restart always \ -v /srv/dataops-runner-$AGENT_NAME/config:/etc/gitlab-runner \ -v /var/run/docker.sock:/var/run/docker.sock \ dataopslive/dataops-runneror, for extra debugging:
docker run -d -e DEBUG=true --name $AGENT_NAME --restart always \ -v /srv/dataops-runner-$AGENT_NAME/config:/etc/gitlab-runner \ -v /var/run/docker.sock:/var/run/docker.sock \ dataopslive/dataops-runnerYou should now see:
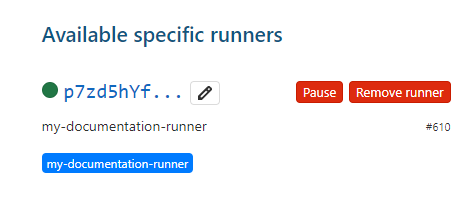
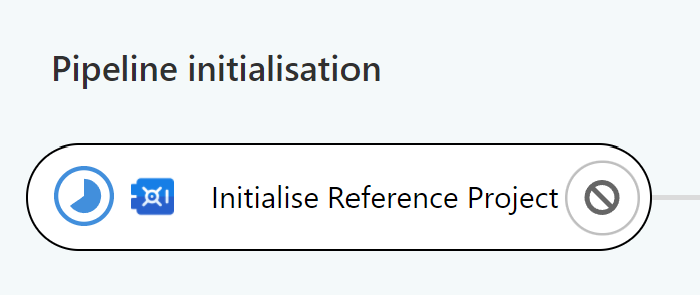
Test this out!
At this point, you should be able to run a pipeline (e.g. full-ci.yml created from the template project). If the first job in the pipeline changes to a blue pie, the job is running on your Runner, everything is connected and you can move on! If not, check your setup and, if needed, contact support@dataops.live
Credentials and Secrets#
The basic security model of the DataOps Platform/Runner model is that the Platform and Repo contain all the information about what should be done, but none of the credentials to actually do it. The credentials are stored on your own Runner so that no one else has access to them. This process is described in more detail here and this page should be read before proceeding any further.
DataOps Vault Setup#
DataOps requires a directory from the host called /secrets with a /secrets/vault.yml and /secrets/vault.salt
To create the minimum base vault configuration simply run:
sudo mkdir -p /secrets echo {} | sudo tee /secrets/vault.yml > /dev/nullecho $RANDOM | md5sum | head -c 20 | sudo tee /secrets/vault.salt > /dev/nullFull details on when and how to add to these are here.